Wednesday, 19 March 2025
Container element\values which has leading zeros are getting trimmed? Solution: Use ContainerClass
Thursday, 8 August 2024
Run CAR(Customization Analysis report) in Dynamics 365 for Finance and operations
How to load number sequence class in UAT\PROD in dynamics 365 for finance and operations.
Wednesday, 22 June 2022
How to Extend Purchase Order Update Functionality to Purchase lines in D365
To extend header field updates to line level is to use extensions and delegates in D365.
Scenario : DlvMode field from PurchTable should be carried and updated to PurchLine.DlvMode field.
Extend the data model
Extend Purchline table in customized model and add DlvMode field to the extension table .
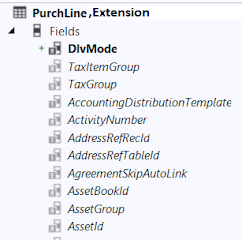
Add DlvMode field to PurchTable fieldGroup HeaderToLineUpdate

Prepare the update-order-lines dialog
The dialog to choose if and which fields need to be updates at the lines is generated automatically based on the HeaderToLineUpdate field group. There is some code needed to show the fields name in the dialog. This is done by subscribing a custom method to the delegate PurchTable2LineField.getFieldDescriptionDelegate.

Create a new class with below code
 |
Extend the framework classes
Create an extension for the AxPurchLinee class and add the below code :

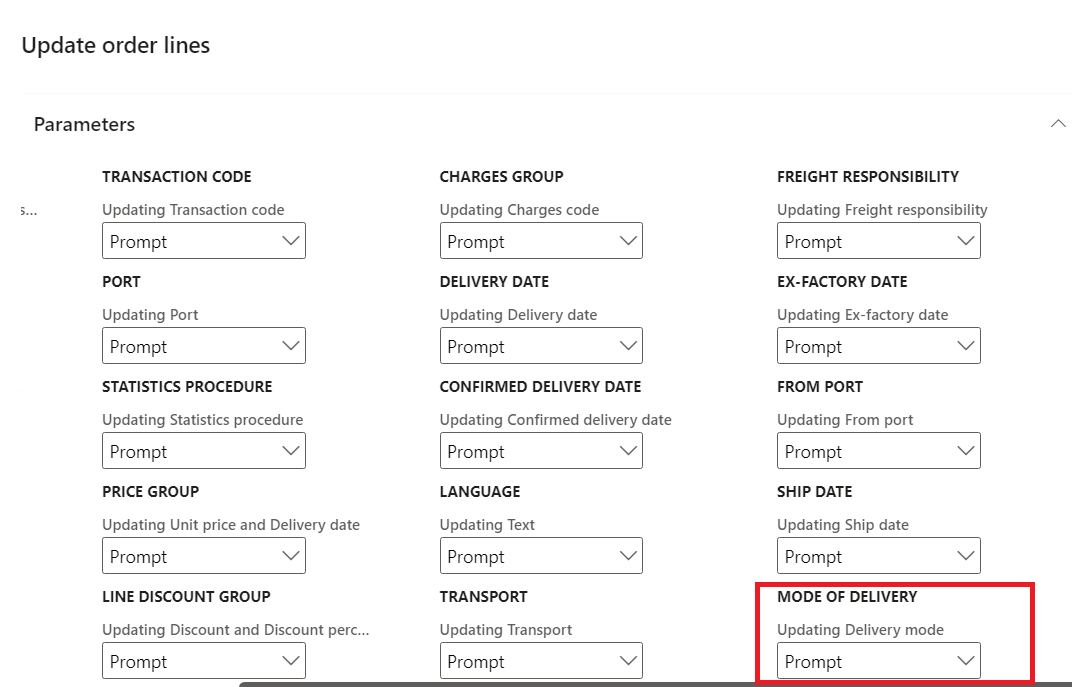
Open the Header to Line update dialog by clicking on Procurement and Sourcing > Setup > Procurement and Sourcing parameters > General update > update order lines button
Done!! Go ahead and test your code.
Change value for DlvMode in Purchase order header update Order lines dialog will open as below. Enable "Update Delivery mode", and select "Update all" and click OK.The DlvMode value from header will get updated at line level DlvMode value.

Happy Coding!!!!
Thanks & Regards
Sindhu
Wednesday, 9 February 2022
Ax 2012\D365 : Cheque creation code
Ax 2012\D365 : Cheque creation code
{
LedgerJournalTrans ledgerJournalTrans;
BankAccountTable bankAccountTable;
BankChequeTable bankChequeTable;
DimensionAttributeValueCombination dimensionAttributeValueCombination;
select firstonly forupdate ledgerJournalTrans
where ledgerJournalTrans.JournalNum == '12345' &&
ledgerJournalTrans.linenum == 1; ledgerJournalTrans.LineNum == 1;
if (ledgerJournalTrans.AmountCurDebit)
{
select firstonly DisplayValue
from dimensionAttributeValueCombination
where dimensionAttributeValueCombination.RecId == ledgerJournalTrans.LedgerDimension;
bankChequeTable.clear();
bankChequeTable.ChequeNum = ledgerJournalTrans.PLI_BankChequeNum;
bankChequeTable.ChequeStatus = ChequeStatus::Payment;
bankChequeTable.AccountID = bankAccountTable.AccountId;
bankChequeTable.RecipientType = BankChequeRecipientType::Cust;
bankChequeTable.AmountCur = ledgerJournalTrans.AmountCurDebit;
bankChequeTable.BankCurrencyAmount = ledgerJournalTrans.AmountCurDebit;
bankChequeTable.RecipientCompany = ledgerJournalTrans.Company;
bankChequeTable.TransDate = staging.TransactionDate ;
bankChequeTable.CurrencyCode = ledgerjournalTrans.CurrencyCode;
bankChequeTable.BankCurrency = ledgerjournalTrans.CurrencyCode;
bankChequeTable.RecipientAccountNum = dimensionAttributeValueCombination.DisplayValue;
bankChequeTable.Voucher = ledgerjournalTrans.Voucher;
bankChequeTable.RecipientTransVoucher = ledgerjournalTrans.Voucher;
bankChequeTable.SourceTableId = ledgerjournalTrans.TableId;
bankChequeTable.SourceRecId = ledgerjournalTrans.RecId;
if (BankChequeTable::exist(ledgerJournalTrans.PLI_BankChequeNum, ledgerjournalTrans.PLI_Account))
{
checkFailed(strfmt("@SYS24139", bankChequeTable.ChequeNum));
throw error("@SYS18447");
}
bankChequeTable.insert();
ttsbegin;
ledgerJournalTrans.BankChequeNum = bankChequeTable.ChequeNum;
ledgerjournalTrans.PaymentStatus = CustVendPaymStatus::Sent;
ledgerJournalTrans.PaymReference = bankChequeTable.ChequeNum;
ledgerJournalTrans.update();
ttscommit;
}
}
Populate LedgerDimension value through code Ax 2012 & D365
Populate LedgerDimension value through code Ax 2012 & D365
Monday, 11 January 2021
X++ code to generate ledger voucher number sequence in AX 2012 & D365
X++ code to generate ledger voucher number sequence in AX 2012 & D365
NumberSeq numberSeq;
NumberSequenceTable numSeqTable;
Voucher voucher;
select firstOnly numSeqTable
where numSeqTable.RecId == LedgerJournalName::find(ledgerJournalTable.JournalName).NumberSequenceTable;
if (numSeqTable && !voucher)
{
numberseq = numberseq::newGetVoucherFromCode(numSeqTable.NumberSequence);
voucher = numberseq.voucher();
}
ledgerJournalTrans.Voucher = voucher;
Saturday, 2 January 2021
Create Ledger Dimension through Code (x++)
Create Ledger Dimension through Code (x++)
Microsoft has provided a service class which has a method provided internally that merges the default dimension and the ledger account that you require.
This works only when you have default dimension & ledgerAccount that you want to merge .
LedgerDimension = DimensionDerivationDistributionRule::buildLedgerDimension(ledgerDimension,DefaultDimension);
Here the parameter Default dimension is the recid contains combination of your dimension values.
LedgerDimension is the LedgerMainAccount that is defaulted when you creating journals.
P.S : Default dimension creation code is provided in my another blog which return the RecId needed as aa parameter 'DefaultDimension' for the method buildLedgerDimension() in the above one liner code.
Blog for default dimension creation code :
https://sbdynaax.blogspot.com/2021/01/c-reate-default-dimension-with-set-of.html
Thanks & Regards
Sindhu
Create Default Dimension with a set of dimension values through Code (x++)
Create Default Dimension with a set of dimension values through Code (x++)
Below job specifies set of dimension values and get the default dimension(Recid) for that combination of the values passed.
static void getDefaultDimension(Args _args)
{
DimensionAttributeValueSetStorage valueSetStorage = new DimensionAttributeValueSetStorage();
DimensionDefault result;
int i;
DimensionAttribute dimensionAttribute;
DimensionAttributeValue dimensionAttributeValue;
container conAttr = [“Department”,”CostCentre” ,”ExpensePurpose”];
container conValue = [“00000030”, “OU_4574”, “Conference/Seminar”];
str dimValue;
for (i = 1; i <= conLen(conAttr); i++)
{
dimensionAttribute = dimensionAttribute::findByName(conPeek(conAttr,i));
if (dimensionAttribute.RecId == 0)
{
continue;
}
dimValue = conPeek(conValue,i);
if (dimValue != "")
{
// The last parameter is "true". A dimensionAttributeValue record will be created if not found.
dimensionAttributeValue =
dimensionAttributeValue::findByDimensionAttributeAndValue(dimensionAttribute,dimValue,false,true);
// Add the dimensionAttibuteValue to the default dimension
valueSetStorage.addItem(dimensionAttributeValue);
}
}
result = valueSetStorage.save();
}
Thanks & Regards
Sindhu
Thursday, 24 December 2020
D365 F&O Import Data entity: postTargetProcess, copyCustomStagingToTarget
D365 F&O Import Data entity: postTargetProcess, copyCustomStagingToTarget methods not called
No row processing is achieved by enabling "Set-based processing = True" and is used to imports records really fast.
Data management workspace > Data entities button

But when you really want to write some "postprocessing" logic, with the above setting the methods "postTargetProcess()", "copyCustomStagingToTarget()" are not called. Data entity with "Set-based processing" = false, calls "postTargetProcess( )" and "copyCustomStagingToTarget()" method .
One way to run postTargetProcess() code after importing all records with "Set-based processing" = true on data entity is using post handlers.
[PostHandlerFor(classStr(DmfEntityWriter), methodStr(DmfEntityWriter, write))]
public static void DmfEntityWriter_Post_write(XppPrePostArgs args)
{
DMFDefinitionGroupExecution _dmfDefinitionGroupExecution = args.getArg('_definitionGroupExecution');
// come code to iterate target table records exists joined from staging
}
This method is called for all staging records where TransferStatus::Completed.
As this post hadler method is from the DMF base class DmfEntityWriter, it will be called for all entites.Hence we need to be careful while using this method and handle the logic for different entities with switch case as below.
str callerEntity = dmfDefinitionGroupExecution.EntityXMLName;
switch (callerEntity)
{
case 'CustCustomersV3Entity':
// something
break;
}
Thanks & RegardsD365 F&O Data Entity : DMF Methods calling sequence
D365 F&O Data Entity : DMF Methods calling sequence

Thanks & Regards
Sindhu
Segmented Entry Controls in Dynamics AX 2012
I was going through the segmented entry control on the form and found that AX 2012 has changed the way ledger dimensions populate on the form.
A new control type has been added in AX 2012 as shown below.

You can add a segmented entry control to a form when you want that form to show an account number and related dimensions from the chart of accounts. In addition, you use the segmented entry control to associate an account and related financial dimensions with the record that appears in the form. To update the values in the control, you can use a lookup or a list of recently used values to select a value for each segment. Finally, you can have the control validate the updated segments to ensure the account and financial dimensions are a valid combination[msdn]
For more information : click here
Let me show you how to quickly get this working on the form.
To explain this, I am using ProjParameters Table.
Add a new Int64 field to ProjParameters Table by name “LedgerDimension”
and set the extendedDataType as “LedgerDimensionAccount”

Add a new relation with “DimensionAttributeValueCombination” table.Right click on the relations Node >> New relation and set the relations as shown below

Now create a normal relation as shown below. Right click on the newly created relations and chose Normal relation.

we are done with the table customization and lets move to the form “ProjParameters”
Go to AOT >> Forms >> ProjParameters >> right click on the form and restore.
Expand the datasources node >> projParameters >> Drag and drop the LedgerDimension field on to Design >> General TabPage as shown below.

Once you drag drop this datafield ledgerDimension, a new segmentedEntry control will be created. Save the form and open the form [Ctrl + O].
you will find the ledger account control in the General Tab. But when you try to look at the ledger accounts, you will not find anything[empty – no lookup values]..
hmm.. interesting..what am I missing here?? Let me help you how to get this..
In AX 2012, there is a class “LedgerDimensionAccountController” which does the trick of population of accounts. LedgerDimensionAccountController class provides control interaction logic for any use of the account number control in the UI.
Lets proceed. Go to the classdeclaration and create an object for LedgerDimensionAccountController class as shown below
public class FormRun extends ObjectRun
{
//..standard code
LedgerDimensionAccountController ledgerDimensionAccountController;
}
Override the init() method of the form and instantiate the object of the class as shown below with the projparameters_ds and the field name “LedgerDimension”
public void init()
{
//…standard code
// Initialize account controllers
ledgerDimensionAccountController = LedgerDimensionAccountController::construct(projParameters_DS, fieldstr(ProjParameters, LedgerDimension));
}
Go to datasources >> projParameters >> fields >> ledgerDimension >> add a new method called resolvereference as shown below
public Common resolveReference(FormReferenceControl _formReferenceControl)
{
return ledgerDimensionAccountController.resolveReference();
}

After you add the control to the form, you must provide the control with the ability to retrieve data, select a value for a segment, and validate the selected values. Typically, you use a controller class to override several segmented entry control methods.
Now, expand Design node >> segmented Entry control which has been recently created >> right click and override the “jumpref” method and add the below code
public void jumpRef()
{
ledgerDimensionAccountController.jumpRef();
super();
}
Right click again on th segmented entry control and override “loadAutoCompleteData” method and add the below code
Public void loadAutoCompleteData(loadAutoCompleteDataEventArgs _e)
{
super(_e);
ledgerDimensionAccountController.loadAutoCompleteData(_e);
}
Right click again on the segmented control and override “loadsegments” method and add the below code
public void loadSegments()
{
super();
ledgerDimensionAccountController.parmControl(this);
ledgerDimensionAccountController.loadSegments();
}
Right click on the segmented entry control and override “segmentValueChanged” and add the below code
public void segmentValueChanged(SegmentValueChangedEventArgs _e)
{
super(_e);
ledgerDimensionAccountController.segmentValueChanged(_e);
}
Lastly , right click on the segmented control and override “validate” method and add the code below
public boolean validate()
{
boolean isValid;
isValid = super();
isValid = ledgerDimensionAccountController.validate() && isValid;
return isValid;
}
For more details on the overridden methods above : click here
Done, we are good now to see the ledger accounts with the segments [if any] in the lookup.
Right click on the projParameters form and open the form.

Tuesday, 11 June 2019
D365 : How to reset usage data
Go to Settings > User Options


Click Reset button to reset the usage data for that particular User Id.

Monday, 6 April 2015
Restore deleted Sales order in AX 2012
How to Restore deleted sales order or purchase order Ax 2012 ?
In fact the history tables contains sent Confirmations, Packing slips and Invoices.
static void restoreDeletedSO(Args _args)
{
SalesTableDelete salesTableDelete;
SalesLineDelete salesLineDelete;
SalesTable salesTable;
SalesLine salesLine;
;
SalesTableDelete = SalesTableDelete::find(‘00450_036′, true);
ttsbegin;
switch (salesTableDelete.Cancelled)
{
case Voided::Voided :
salesTable = conpeek(salesTableDelete.SalesTable, 1);
salesTable.insert();
while select forupdate salesLineDelete where salesLineDelete.SalesId == salesTableDelete.SalesId
{
salesLine = conpeek(salesLineDelete.SalesLine, 1);
salesLine.insert();
}
salesTableDelete.delete();
break;
case Voided::linesVoided :
while select forupdate salesLineDelete where salesLineDelete.SalesId == salesTableDelete.SalesId
{
salesLine = conpeek(salesLineDelete.SalesLine, 1);
salesLine.insert();
salesLineDelete.delete();
}
salesTableDelete.delete();
break;
}
ttscommit;
}
Wednesday, 6 August 2014
Linking images to Items in Item Master
How to link an image to an item in Item Master in AX 2012?
1) Copy the images in the required path.2) Create a new job to link images to items.
static void uploadProductImages(Args _args)
{
DocuRef docuRef;
DocuValue docuValue;
InventTable inventTable;
EcoResProductImage ecoResProductImage;
System.String[] fileNames;
int fileCount, i;
str fileName, trimmedFileName, fileNameWithExt;
BinData binData;
str filePath;
System.IO.FileInfo fileInfo;
EcoResProduct ecoResProduct;
EcoResProductImageManagement productImageManagement;
EcoResProductImageThumbnail ecoResProductImageThumbnail;
filePath = 'Specify the path where your images are saved here.';
// File path should be provided as : C:\\Images\\Car.jpg
binData = new BinData();
fileNames = System.IO.Directory::GetFiles(filePath);
fileCount = fileNames.get_Length();
ttsBegin;
for (i=0; i<fileCount; i++)
{
fileName = fileNames.GetValue(i);
// Get only the file name. If value returned is C:\Images\Car.jpg, get only Car.jpg
trimmedFileName = substr(fileName, strscan(fileName, '\\', strlen(fileName),
-strlen(fileName))+ 1, strlen(fileName));
fileNameWithExt = trimmedFileName;
if (trimmedFileName)
{
// Assuming file extension is always .jpg, removing it
trimmedFileName = strreplace(trimmedFileName, ".jpg", "");
}
// assuming image name matches item name in AX
ecoResProduct = EcoResProduct::findByDisplayProductNumber(trimmedFileName);
inventTable = InventTable::findByProduct(ecoResProduct.RecId);
if (inventTable)
{
binData.loadFile(fileName);
docuValue.FileName = trimmedFileName;
docuValue.FileType = "jpg";
docuValue.OriginalFileName = fileNameWithExt;
docuValue.File = binData.getData();
docuValue.insert();
docuRef.ValueRecId = docuValue.RecId;
docuRef.RefTableId = tableNum(InventTable);
docuRef.Name = trimmedFileName;
docuRef.RefRecId = inventTable.RecId;
docuRef.RefCompanyId = inventTable.dataAreaId;
docuRef.TypeId = "Image";
docuRef.insert();
ecoResProductImage.clear();
ecoResProductImage.DefaultImage = true;
ecoResProductImage.FileName = fileNameWithExt;
ecoResProductImage.ImageFormat = "jpg";
ecoResProductImage.RefRecId = docuRef.RecId;
ecoResProductImage.RefRecord = docuRef.RefRecId;
ecoResProductImage.Usage = EcoResProductImageUsage::External;
//0; // Base Enum: 0=External, 1=Internal
// To make the thumbnail size
ecoResProductImageThumbnail = new EcoResProductImageThumbnail(false);
ecoResProductImage.MediumSize = ecoResProductImageThumbnail.generateThumbnail(204,204,docuRef);
ecoResProductImage.ThumbnailSize = ecoResProductImageThumbnail.generateThumbnail(48,48,docuRef);
ecoResProductImage.insert();
info(strFmt("%1 - %2", docuValue.RecId, docuRef.RecId));
}
}
ttsCommit;
}
3) Make sure you have a document type of type "Image"(as we are linking images to items) created in
Organization Administration > Setup > Document Management > Document Types.
Thanks & Regards